How to use the nVoq Wireless Microphone (iPhone or Android) with SayIt
To use the nVoq Wireless Microphone with SayIt, follow these instructions:
1. Download the nVoq Wireless Microphone from with the App Store for iOS devices (iPhone) or the Google Play Store for Android devices.

Note: On the Play Store, there are two nVoq products on there. Make sure to download the nVoq Wireless Microphone and NOT the nVoq.Mobile.Voice a
2. Once you have installed the app, log into the app on your phone. Use the same username and password as you use with the SayIt client.
Note: Make sure to choose canada.nvoq.com from the server list or you won't be able to login.
3. Once you sign in, unless you have already configured your SayIt client for the wireless mic, you will see a bar at the top saying "Please sign in to a Voice Client then tap here" as shown below
Now let's setup the SayIt client to use the wireless microphone.
4. If not opened, launch and log in to the SayIt client
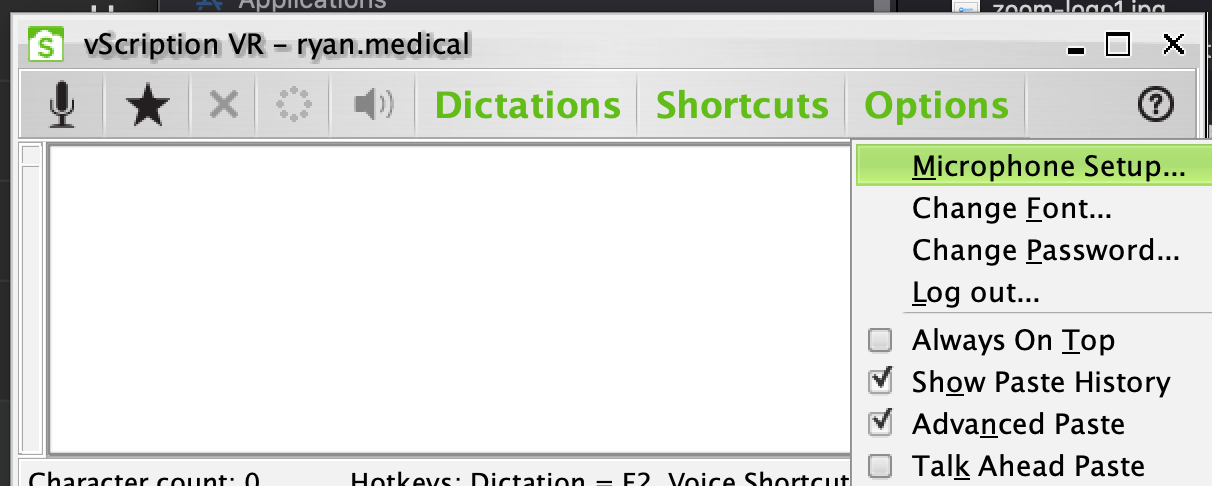
5. On the SayIt client, click Options, then click Microphone Setup (Note: Your SayIt client may have different colors and title than shown below but the same applies)
6. On the Welcome to the Microphone Setup page, click Next
7. From the Microphone list, choose the Wireless Microphone the click Next
8. Click Finish

Note: Unlike when using USB microphones, there is no audio wizard to run when using the Wireless Microphone
9. After clicking Finish, you will get a small window popup asking you to enter a name for this computer and click OK. This is the name you will reference in the Wireless Microphone in the next step.
Note: You can have multiple workstations running SayIt at once with different names. You can then choose the computer you want to connect the Wireless Microphone to.
10. Now on your iPhone or Android device, bring up the nVoq Wireless Microphone and tap the "Please sign in to a Voice Client then tap here". You should then see the computer we setup in the previous step. Tap that entry then tap Apply
Note: Once the SayIt client is configured for the Wireless Microphone, whenever you launch the nVoq Wireless Microphone, it should automatically connect to that SayIt client.
11. You will now be at the main Wireless App screen and can begin dictating.
To begin dictating, tap the Microphone button to turn the microphone on then tap again to turn the microphone off. Remeber to turn the microphone off when done dictating. You can activate shortcuts by clicking the Star key and if you are using Select and Say or a form template, you can navigate through the fields by using the forward and back buttons and then click the checkbox to transfer the text to your EMR or other application.
More detailed instructions on the nVoq wireless microphone can be found at the link below;

You may notice a delay when using the Wireless Microphone versus using a USB microphone, This is expected and will not affect your recognition in any way.
If you switch between USB and Wireless Microphone, you will need to run the audio wizard each time you switch to a USB microphone.
Related Articles
How To Use SayIt for Backend Transcription using your iPhone
To create dictations for backend transcription: 1. In the nVoq Wireless microphone application, tap the Transcription button on the bottom left of the screen 2. Enter an identifier to be able to locate your dictations easier when reviewing them on ...How To Setup SayIt on a Mac - Updated
Note: Current version of SayIt is 17.0 and the minimum support macOS version is 11 however it is highly recommended to update to macOS 11. M1 processors are now supported as well. Just be sure to enable code signing in step 7.3 to ensure local USB ...Audio Recognition Not Working For Any Sources with SayIt
If you are running SayIt and the application launches and seems to work find but you can't put it in record mode nor get the microphone wizard to work, check to see if the user has Fast Dictation enabled. If so, disable this and try again. When using ...How to configure Winscribe Professional App
1. Download and install the Winscribe Professional app from the App Store (NOT the Winscribe Medical App) 2. Launch the app and click on the Settings tab at the bottom 3. Enter the Author ID and password. 4. In the WsPPC Web Server URL, enter the ...Unable to launch SayIt - Troubleshooting
Here you will find various SayIt Launch Issues and Troubleshooting Tips SayIt Launches with the wrong program or just opens a command window and closes If when trying to launch SayIt, a different application opens ie: Windows Media Player, or you run ...